Learn How to Naturally Dye Eggs
If you’re interested in having a more eco-friendly Easter, one great way is to naturally dye eggs. Since you can easily make your own natural dye using food scraps, you likely have everything you need in your kitchen right now.
By following these simple steps, you can enjoy the beautiful and soft colors of naturally dyed eggs, cut back on the amount of food scraps you throw away, and save money!
As you’re getting ready to dye your eggs, don’t forget to check out these other easy tips for celebrating an eco-friendly Easter.
Related: The Best Eco-Friendly Easter Basket Ideas
Creating Your Natural Dye

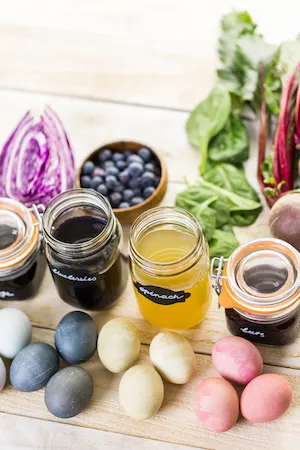
When you’re ready to naturally dye eggs, the first step is to make your own dye. If you’re not sure how to make dye, you can follow these simple steps for creating natural dye.
If you want to naturally dye eggs but don’t have the time to create your own dye, these natural dyes are made using spices and vegetable juices. You can use them to color eggs, tint frosting, and more.
Related: Amazing Eco-Friendly Art Supplies for Kids and Adults
Once you have your natural dyes, you’re ready to dye your eggs.
What You’ll Need to Naturally Dye Eggs
- Natural dye
- Castile soap
- Vinegar
- Bowls
- Mason jars with lids
- Spoon
- Drying rack
- Olive oil
- Eggs
Directions to Naturally Dye Eggs


1. Add eggs to a pot and fill with cold water until it’s an inch over the eggs. Bring water to a boil. Once the water is boiling, turn off the heat, remove the pot from the heat, and cover it. Let the eggs sit in the water for 10 minutes. Put the eggs in cold water, and let them sit until they’re cool to the touch.
2. Drain the cool water and replace it with warm water. Use Castile soap to gently clean off the oil that prevents the natural dye from adhering to the eggshell.
Related: Excellent Castile Soap Uses Around the Home
3. Pour the natural dyes into the bowls and add a tablespoon of vinegar for every cup of dye. Mix well.
4. Place the hard-boiled eggs in the mason jars and pour your natural dyes over them. If you just made your natural dyes, it’s important to let them cool down before you pour them over the eggs.
5. Put the lids on the mason jars, and place them in the refrigerator to chill. Let the eggs soak until they reach the desired color.
6. When the eggs are ready, scoop them out using a spoon and place them on a drying rack.
7. Naturally dyed eggs will have a matte finish. If you want them to look shinier, use a towel to rub a few drops of olive oil on them.
8. Store your naturally dyed eggs in the refrigerator until you’re ready to hide them or eat them!
How to Naturally Dye Eggs
One nice thing about naturally dyed eggs is that they have soft colors that work perfectly for Easter.
You can also create experiments to see what types of colors you can make. Change up the different food scraps and how long you leave the eggs in the dye to see what colors you can come up with.
More Eco-Friendly Holiday Tips
Now that you’ve created some beautiful naturally dyed eggs for Easter, are you ready to see how easy it is to enjoy other eco-friendly holidays? Then be sure to check out some of our other popular posts:
- Celebrating an Eco-Friendly Valentine’s Day
- Top Eco-Friendly Gifts for Mother’s Day
- How to Have an Eco-Friendly Halloween
- Enjoy an Eco-Friendly Thanksgiving
- The Best Eco-Friendly Gifts Under $25


